|
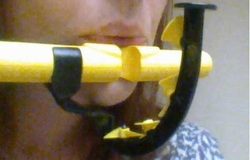
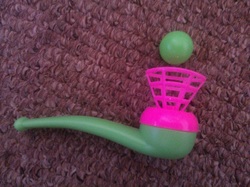
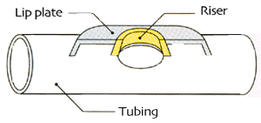
In part one of this post, I talked about the technology - mainly iPad apps - that I use in teaching. Today's post is about the less techy, but no less useful, gadgets that I carry around! The 'physical' gadgets I use mostly involve blowing. The flute is a bit of an oddity in the way you 'blow' - for most woodwind instruments you blow down into the instrument to make a sound. Lots of people have played the recorder at school and often beginners will try to blow down the flute in the same way. But on the flute the breath needs to go across the lip plate, hitting the 'riser' or 'chimney' inside to make a sound. Helpful image from http://www.justflutes.com/blog/ian-mclauchlans-guide-to-making-a-headjoint-the-riser/ showing the parts of the headjoint. I remember as a beginner being taught that it was a bit like blowing across a bottle, and attending a fabulous flute day where we all blew bottles, 'tuned' to different notes with different amounts of water in them, to play a piece. It would be a bit awkward to carry a glass bottle around to all my lessons, but thankfully there is a bit of flute 'kit' which helps students get to grips with 'blowing across'. Presenting, the Pneumo Pro (and my chin)...  The Pneumo Pro is a plastic replica of a flute headjoint, with a gap to let the air through and what is basically a collection of small windmills attached. A couple of my younger students know it as the "helicopter thingy". Essentially, it's a fabulous way of seeing where you're blowing - you blow across, and the windmills go round. It's great for getting to grips with the initial idea of blowing across, but also useful as students progress. The different height windmills relate to the different angles of blowing required to play in different octaves, so it's helpful for feeling the level of lip and jaw flexibility needed. And it can also be used for practising keeping a steady airstream, both soft and strong, and for making sure that tonguing isn't getting in the way of the air. Plus, it's a bright yellow, fun, "helicopter thingy", what's not to love?! The other bit of equipment I've used quite a lot is a straw. Squeezing a straw to narrow it and blowing through helps to feel the 'diaphragm' muscles which are needed for breath support, another one of those things which is easier to grasp through feeling it than through explanations! But partly inspired by new website Flutemotion, which sells all sorts of flute gadgets, I've recently invested in some more fun ways of demonstrating and practising breath support, and now have a stash of these...  This simple pipe and ball toy (bought in bulk from a kids 'party bag' toy supplier) does the same job as the straw, but with the added bonus/ challenge of having to keep the ball in the air. It really helps you feel those breath support muscles engage, and kids (and big kids) like testing themselves with how long they can keep the ball up each time. It's only disadvantage is having to retrieve said ball from the floor/ other side of the room several times per lesson! I'm currently awaiting a delivery of some whistling lips to try out, and am planning a few games of Blow Football at my next student workshop...
0 Comments
Your comment will be posted after it is approved.
Leave a Reply. |
Keep in touch
I have an email newsletter where I share my latest blog posts, news from the flute and wider musical world, my current projects, and things I've found that I think are interesting and useful and would love to share with you. Expect lots about music and education, plus the occasional dip into research, language, freelance life, gardening and other nice things. Sign up below! Archives
July 2019
Categories
All
|

 RSS Feed
